#sqlite replication
Explore tagged Tumblr posts
Visit Tumblr Blog
Explore Tumblr blogs with no restrictions, modern design and the best experience.
Last Seen Tumblr Blogs


Fun Fact
After the announcement of the deal with Yahoo!, there were 170K signatures of unhappy Tumblr users petitioning to prevent the sale in 2013.
Text
Snapshot Replication is a robust feature in SQL Server that allows data to be distributed as it appears at a specific point in time. Let's Explore:
https://madesimplemssql.com/snapshot-replication/
Please follow on FB: https://www.facebook.com/profile.php?id=100091338502392

#technews#microsoft#sqlite#sqlserver#database#sql#tumblr milestone#powerbi#data#vpn#sql help#microsoft azure#azure#replication
2 notes
·
View notes
Text
tumblr-backup and datasette
I've been using tumblr_backup, a script that replicates the old Tumblr backup format, for a while. I use it both to back up my main blog and the likes I've accumulated; they outnumber posts over two to one, it turns out.
Sadly, there isn't an 'archive' view of likes, so I have no idea what's there from way back in 2010, when I first really heavily used Tumblr. Heck, even getting back to 2021 is hard. Pulling that data to manipulate it locally seems wise.
I was never quite sure it'd backed up all of my likes, and it turns out that a change to the API was in fact limiting it to the most recent 1,000 entries. Luckily, someone else noticed this well before I did, and a new version, tumblr-backup, not only exists, but is a Python package, which made it easy to install and run. (You do need an API key.)
I ran it using this invocation, which saved likes (-l), didn't download images (-k), skipped the first 1,000 entries (-s 1000), and output to the directory 'likes/full' (-O):
tumblr-backup -j -k -l -s 1000 blech -O likes/full
This gave me over 12,000 files in likes/full/json, one per like. This is great, but a database is nice for querying. Luckily, jq exists:
jq -s 'map(.)' likes/full/json/*.json > likes/full/likes.json
This slurps (-s) in every JSON file, iterates over them to make a list, and then saves it in a new JSON file, likes.json. There was a follow-up I did to get it into the right format for sqlite3:
jq -c '.[]' likes/full/likes.json > likes/full/likes-nl.json
A smart reader can probably combine those into a single operator.
Using Simon Willison's sqlite-utils package, I could then load all of them into a database (with --alter because the keys of each JSON file vary, so the initial column setup is incomplete):
sqlite-utils insert likes/full/likes.db lines likes/full/likes-nl.json --nl --alter
This can then be fed into Willison's Datasette for a nice web UI to query it:
datasette serve --port 8002 likes/full/likes.d
There are a lot of columns there that clutter up the view: I'd suggest this is a good subset (it also shows the post with most notes (likes, reblogs, and comments combined) at the top):
select rowid, id, short_url, slug, blog_name, date, timestamp, liked_timestamp, caption, format, note_count, state, summary, tags, type from lines order by note_count desc limit 101
Happy excavating!
2 notes
·
View notes
Text
Litestream – Opensource disaster recovery and continuous replication for SQLite
https://litestream.io/
0 notes
Text
Top 5 Database for iOS App Development
In the dynamic world of iOS app development, choosing the right database is a crucial step towards building successful and user-friendly applications. With a plethora of options available, it's essential to identify the top 5 databases that offer the ideal blend of features and performance. This guide will walk you through the leading database solutions for iOS app development, providing valuable insights and expert recommendations to help you make informed decisions. Top 5 Database for iOS App Development Firebase Realtime Database Firebase Realtime Database is a cloud-hosted NoSQL database that offers real-time synchronization and offline capabilities. This highly-scalable solution is perfect for applications requiring instant updates, such as messaging and collaboration apps. Its JSON-based structure allows for flexibility in data modeling. Key Features: - Real-time synchronization - Offline access - Flexible data structure - Scalable architecture Benefits: - Instant updates across devices - Reliable offline functionality - Seamless integration with other Firebase services CoreData CoreData is a framework provided by Apple for managing the object graph and persistence of data in iOS apps. It offers an efficient way to work with data models, relationships, and caching. While it's not a traditional database, CoreData provides a powerful local data storage solution. Key Features: - Object graph management - Data model relationships - Caching and performance optimization - Lightweight local storage Benefits: - Efficient data management - Reduced network requests - Enhanced performance for local data Realm Realm is a mobile database designed for simplicity and ease of use. It offers an object-oriented approach to database management and supports both local and server-based databases. Realm's live objects provide automatic updates whenever the data changes. Key Features: - Object-oriented database - Automatic data updates - Cross-platform support - Encryption and security features Benefits: - Intuitive data modeling - Real-time data synchronization - Seamless integration with various platforms SQLite SQLite is a lightweight and self-contained relational database engine that is embedded directly into the application. It's an ideal choice for applications that need a local database with a small memory footprint. Despite its compact size, SQLite is powerful and supports SQL queries. Key Features: - Self-contained database engine - Small memory footprint - SQL query support - ACID-compliant transactions Benefits: - Minimal setup and configuration - Efficient local storage - Reliable data integrity Couchbase Lite Couchbase Lite is a NoSQL database that focuses on mobile-first applications. It offers a unique synchronization feature that enables seamless data replication between devices. This is particularly useful for apps that require data consistency across various platforms. Key Features: - NoSQL document-based storage - Multi-platform synchronization - Offline-first architecture - Conflict resolution capabilities Benefits: - Consistent data across devices - Robust offline functionality - Simplified conflict resolution FAQs Q: Which database is best for real-time synchronization in iOS apps?A: Firebase Realtime Database is an excellent choice for real-time synchronization, offering instant updates and offline access. Q: Can I use CoreData for server-based databases?A: CoreData is primarily designed for local data storage. For server-based databases, consider solutions like Firebase or Realm. Q: Is SQLite suitable for large-scale applications?A: While SQLite is lightweight and efficient, it may not be the best choice for large-scale applications with high data volumes. Q: How does Realm's automatic data update feature work?A: Realm's live objects automatically update whenever the underlying data changes, ensuring real-time synchronization. Q: Does Couchbase Lite support conflict resolution?A: Yes, Couchbase Lite includes conflict resolution capabilities, ensuring data consistency in multi-device environments. Q: Can I use multiple databases in a single iOS app?A: Yes, you can use different databases for various purposes within an iOS app, based on your application's requirements. Conclusion: Selecting the right database for your iOS app development project is a critical decision that impacts performance, user experience, and scalability. By exploring the top 5 databases – Firebase Realtime Database, CoreData, Realm, SQLite, and Couchbase Lite – you gain a deeper understanding of their features and benefits. Whether you need real-time synchronization, efficient local storage, or seamless multi-device data replication, there's a suitable database solution for your specific needs. Remember to consider factors like data model complexity, synchronization requirements, and your app's growth potential when making your choice. Read the full article
0 notes
Text
SQLedge
SQLedge: Replicate Postgres to SQLite on the Edge – https://github.com/zknill/sqledge
View On WordPress
0 notes
Text
Embedded Databases Decoded: Choosing the Right Type for Your Application’s Success
An embedded database is a database management system that is integrated within an application rather than being a standalone system. This means that the application has direct control over the database, and the database runs within the same process as the application. Embedded databases are often used in applications where data needs to be stored and accessed locally, without the need for a separate database server.
Embedded databases are typically used when an application needs to store data locally and the data is not shared with other applications or users. They are often used in desktop and mobile applications, as well as in embedded systems such as IoT devices, where network connectivity may be limited or unreliable.
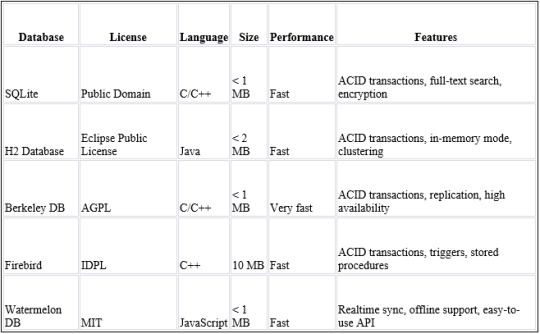
Some common examples of embedded databases include SQLite, H2 Database, Berkeley DB, and Firebird. These databases are often lightweight, fast, and efficient, making them ideal for use in applications with limited resources. They may also include features such as ACID transactions, replication, or full-text search, depending on the specific needs of the application.
When to use one?
Embedded databases are typically used when an application needs to store data locally and the data is not shared with other applications or users. They are often used in desktop and mobile applications, as well as in embedded systems such as IoT devices, where network connectivity may be limited or unreliable. One popular embedded database that deserves special mention is Watermelon DB. Watermelon DB is an open-source, reactive database that is designed specifically for use in client-side applications. It provides a fast and reliable way to store data locally, with built-in support for offline data synchronization.
Watermelon DB is ideal for use in mobile and web applications that need to work offline. It uses a data synchronization protocol called Differential Synchronization, which allows the database to synchronize with a remote server while minimizing bandwidth usage and reducing conflicts. Watermelon DB is also highly scalable, making it suitable for use in applications with large and complex data models.
Some common use cases for embedded databases include:
● Desktop and mobile applications that need to store data locally.
● IoT devices that need to store sensor data locally.
● Point-of-sale systems that need to store transaction data locally.
● Gaming applications that need to store game data locally.
● Medical devices that need to store patient data locally.
Popular Embedded databases:
● SQLite: A lightweight, open-source database that is widely used in mobile and desktop applications.
● H2 Database: A Java-based database that is designed to be fast and efficient.
● Berkley DB: A high-performance, embeddable database that is used in a wide range of applications.
How to choose the correct embedded database?
Choosing the correct embedded database for your application depends on a number of factors, such as the size and complexity of the application, the performance requirements, and the desired features. Here are some steps you can follow to choose the right embedded database for your needs:
· Identify the requirements of your application: Determine what kind of data needs to be stored and how it will be accessed, as well as any performance or scalability requirements.
· Consider the size of the database: Depending on the size of your application and the amount of data you need to store, you may need to choose a database that is lightweight and efficient. Look for databases that have a small footprint and use minimal system resources.
· Evaluate the performance: Consider the performance characteristics of the database, such as query times and transaction processing speeds, to ensure that it meets your requirements.
· Look for required features: Determine which features are essential for your application, such as support for ACID transactions, replication, or full-text search. Make sure the database you choose includes these features.
· Check the licensing: Some embedded databases have more restrictive licenses than others. Make sure the license of the database you choose is compatible with your application’s requirements and licensing model.
Embedded databases are an important component in many desktop and mobile applications, as well as in embedded systems such as IoT devices. These databases provide a lightweight and efficient way to store data locally without the need for a separate database server.
At CoffeeBeans, we have experience and expertise in using embedded databases to build reliable and efficient solutions for our clients’ offline data storage and synchronization needs. If you’re looking for a partner to help you implement offline capabilities in your mobile or web application, we can help. Our team of experts can help you design and implement a solution that meets your needs and provides a seamless offline user
Read more
0 notes
Text
SQLite 的 HC-tree 計畫
Hacker News 首頁上看到的新計畫:「HC-tree is an experimental high-concurrency database back end for SQLite (sqlite.org)」,SQLite 弄了一個實驗性質的 backend,叫做 HC-tree: The HC-tree (hctree) project is an attempt to develop a new database backend that improves upon regular SQLite as follows: 他列了幾個重點,其中「Improved concurrency」這點題到了可以讓多個 writer 同時寫入運作,這點算是 SQLite 很大的改變,目前希望可以做到在 single-threaded 情況下不輸現有的 SQLite: An implicit…
View On WordPress
0 notes
Link
🎖️El único #curso en @udemy_es para realizar #replicación de cualquier #BaseDeDatos #independiente de la #plataforma o #sistemaOperativo
💰86% de #Descuento el #mejor #precio posible
👉 https://lnkd.in/eaSkSge
@symmetricds #PostgreSQL #SQLServer #MySQL #MariaDB #SQLite
#symmetricds#database administrator#Base de datos#database#replication#postgresql#postgres#sqlserver#mariadb#mysql#sqlite
0 notes
Text
New Post has been published on Simplified Coding
New Post has been published on https://www.simplifiedcoding.net/android-sync-sqlite-database-with-server/
Android Sync SQLite Database with Server using PHP and MySQL
Lets learn Android Sync SQLite Database with Server. Assume we have to send some information from the application to our webserver and internet is not available on the device at a particular time. So instead of giving error to the user that internet is not available we can store the data to SQLite and send it later automatically when the internet is available. And this is what we are going to learn in this Android Sync SQLite Database with Server Tutorial.
Contents
1 Android Sync Sqlite Database with Server Demo
2 Creating Web Service and MySQL Database
2.1 Creating Database
2.2 Creating Web Service
2.2.1 Creating Script
2.2.2 Testing Script
3 Android Sync SQLite Database with Server
3.1 Creating Android Project
3.2 Adding Permissions
3.3 Adding Dependencies
3.4 Handling SQLite Operations
3.5 Handling Volley RequestQueue
3.6 Building Interface
3.6.1 MainActivity
3.6.2 ListView
3.7 Building ListView
3.7.1 Model Class
3.7.2 Adapter
3.8 Coding MainActivity
3.9 Detecting Network State
3.9.1 Creating Broadcast Receiver
3.9.2 Adding Receiver in Manifest
3.9.3 Registering Receiver
4 Testing the Application
5 Download Source Code
Android Sync Sqlite Database with Server Demo
You can first see what we are going to learn in this video where I am showing the application.
youtube
Now lets move ahead and start Android Sync Sqlite Database with Server.
Creating Web Service and MySQL Database
Creating Database
I have the following database. I am using XAMPP you can use anything you want.

So we have the database table. Now we will create a php script that will handle the insertion to the database.
Creating Web Service
Creating Script
Create folder in your root directory (in my case it is htdocs).
Now create a php file inside the folder, I have created saveName.php. And write the following code.
<?php /* * Database Constants * Make sure you are putting the values according to your database here */ define('DB_HOST','localhost'); define('DB_USERNAME','root'); define('DB_PASSWORD',''); define('DB_NAME', 'android'); //Connecting to the database $conn = new mysqli(DB_HOST, DB_USERNAME, DB_PASSWORD, DB_NAME); //checking the successful connection if($conn->connect_error) die("Connection failed: " . $conn->connect_error); //making an array to store the response $response = array(); //if there is a post request move ahead if($_SERVER['REQUEST_METHOD']=='POST') //getting the name from request $name = $_POST['name']; //creating a statement to insert to database $stmt = $conn->prepare("INSERT INTO names (name) VALUES (?)"); //binding the parameter to statement $stmt->bind_param("s", $name); //if data inserts successfully if($stmt->execute()) //making success response $response['error'] = false; $response['message'] = 'Name saved successfully'; else //if not making failure response $response['error'] = true; $response['message'] = 'Please try later'; else $response['error'] = true; $response['message'] = "Invalid request"; //displaying the data in json format echo json_encode($response);
Testing Script
Now its time to test the script we created. So in my case the URL is http://localhost/SqliteSync/saveName.php
I am using POSTMAN to test the script and you can see it in below screenshot.
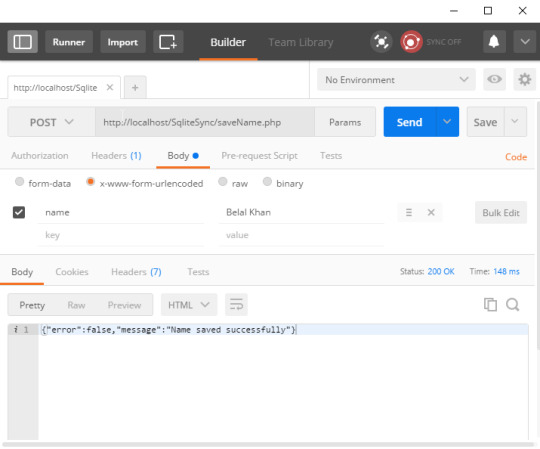
As you can see the script is working fine. Now lets move ahead in android project.
Android Sync SQLite Database with Server
Creating Android Project
Create a new project.
I have created AndroidMySQLSync with an Empty Activity.
Adding Permissions
We need the following permissions so first add these to AndroidManifest.xml.
<uses-permission android:name="android.permission.INTERNET" /> <uses-permission android:name="android.permission.ACCESS_NETWORK_STATE" />
Adding Dependencies
For network requests I am going to use Volley. So add the following line inside dependencies block of your app level build.gradle file.
dependencies compile fileTree(dir: 'libs', include: ['*.jar']) androidTestCompile('com.android.support.test.espresso:espresso-core:2.2.2', exclude group: 'com.android.support', module: 'support-annotations' ) compile 'com.android.support:appcompat-v7:25.0.1' //add this line compile 'com.android.volley:volley:1.0.0' testCompile 'junit:junit:4.12'
Handling SQLite Operations
In this case we have to use both SQLite and MySQL. So a class named DatabaseHelper.java and write the following code.
package net.simplifiedcoding.androidmysqlsync; import android.content.ContentValues; import android.content.Context; import android.database.Cursor; import android.database.sqlite.SQLiteDatabase; import android.database.sqlite.SQLiteOpenHelper; /** * Created by Belal on 1/27/2017. */ public class DatabaseHelper extends SQLiteOpenHelper //Constants for Database name, table name, and column names public static final String DB_NAME = "NamesDB"; public static final String TABLE_NAME = "names"; public static final String COLUMN_ID = "id"; public static final String COLUMN_NAME = "name"; public static final String COLUMN_STATUS = "status"; //database version private static final int DB_VERSION = 1; //Constructor public DatabaseHelper(Context context) super(context, DB_NAME, null, DB_VERSION); //creating the database @Override public void onCreate(SQLiteDatabase db) String sql = "CREATE TABLE " + TABLE_NAME + "(" + COLUMN_ID + " INTEGER PRIMARY KEY AUTOINCREMENT, " + COLUMN_NAME + " VARCHAR, " + COLUMN_STATUS + " TINYINT);"; db.execSQL(sql); //upgrading the database @Override public void onUpgrade(SQLiteDatabase db, int oldVersion, int newVersion) String sql = "DROP TABLE IF EXISTS Persons"; db.execSQL(sql); onCreate(db); /* * This method is taking two arguments * first one is the name that is to be saved * second one is the status * 0 means the name is synced with the server * 1 means the name is not synced with the server * */ public boolean addName(String name, int status) SQLiteDatabase db = this.getWritableDatabase(); ContentValues contentValues = new ContentValues(); contentValues.put(COLUMN_NAME, name); contentValues.put(COLUMN_STATUS, status); db.insert(TABLE_NAME, null, contentValues); db.close(); return true; /* * This method taking two arguments * first one is the id of the name for which * we have to update the sync status * and the second one is the status that will be changed * */ public boolean updateNameStatus(int id, int status) SQLiteDatabase db = this.getWritableDatabase(); ContentValues contentValues = new ContentValues(); contentValues.put(COLUMN_STATUS, status); db.update(TABLE_NAME, contentValues, COLUMN_ID + "=" + id, null); db.close(); return true; /* * this method will give us all the name stored in sqlite * */ public Cursor getNames() SQLiteDatabase db = this.getReadableDatabase(); String sql = "SELECT * FROM " + TABLE_NAME + " ORDER BY " + COLUMN_ID + " ASC;"; Cursor c = db.rawQuery(sql, null); return c; /* * this method is for getting all the unsynced name * so that we can sync it with database * */ public Cursor getUnsyncedNames() SQLiteDatabase db = this.getReadableDatabase(); String sql = "SELECT * FROM " + TABLE_NAME + " WHERE " + COLUMN_STATUS + " = 0;"; Cursor c = db.rawQuery(sql, null); return c;
Handling Volley RequestQueue
We are going to use Volley for http request. So for this we will create a singleton class.
Create a class named VolleySingleton and write the following code.
package net.simplifiedcoding.androidmysqlsync; import android.content.Context; import android.graphics.Bitmap; import android.support.v4.util.LruCache; import com.android.volley.Request; import com.android.volley.RequestQueue; import com.android.volley.toolbox.ImageLoader; import com.android.volley.toolbox.Volley; /** * Created by Belal on 21/09/16. */ public class VolleySingleton private static VolleySingleton mInstance; private RequestQueue mRequestQueue; private static Context mCtx; private VolleySingleton(Context context) mCtx = context; mRequestQueue = getRequestQueue(); public static synchronized VolleySingleton getInstance(Context context) if (mInstance == null) mInstance = new VolleySingleton(context); return mInstance; public RequestQueue getRequestQueue() if (mRequestQueue == null) // getApplicationContext() is key, it keeps you from leaking the // Activity or BroadcastReceiver if someone passes one in. mRequestQueue = Volley.newRequestQueue(mCtx.getApplicationContext()); return mRequestQueue; public <T> void addToRequestQueue(Request<T> req) getRequestQueue().add(req);
Building Interface
MainActivity
Now inside activity_main.xml write the following code.
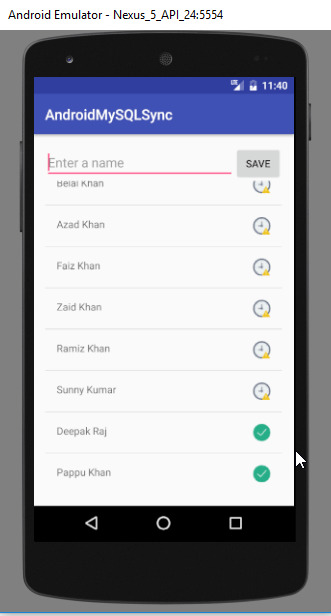
<?xml version="1.0" encoding="utf-8"?> <LinearLayout xmlns:android="http://schemas.android.com/apk/res/android" xmlns:tools="http://schemas.android.com/tools" android:id="@+id/activity_main" android:layout_width="match_parent" android:layout_height="match_parent" android:orientation="vertical" android:paddingBottom="@dimen/activity_vertical_margin" android:paddingLeft="@dimen/activity_horizontal_margin" android:paddingRight="@dimen/activity_horizontal_margin" android:paddingTop="@dimen/activity_vertical_margin" tools:context="net.simplifiedcoding.androidmysqlsync.MainActivity"> <LinearLayout android:layout_width="match_parent" android:layout_height="wrap_content" android:orientation="horizontal"> <EditText android:id="@+id/editTextName" android:layout_width="match_parent" android:layout_height="wrap_content" android:layout_weight="3" android:hint="Enter a name" /> <Button android:id="@+id/buttonSave" android:layout_width="wrap_content" android:layout_height="wrap_content" android:layout_weight="1" android:text="Save" /> </LinearLayout> <ListView android:id="@+id/listViewNames" android:layout_width="match_parent" android:layout_height="wrap_content"></ListView> </LinearLayout>
The above code will generate the following output.
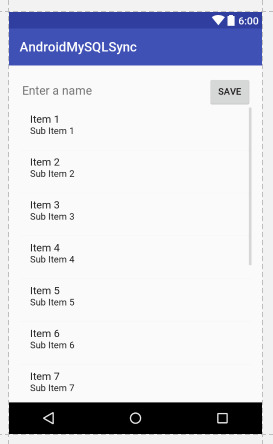
Android Sync SQLite Database with Server
As you can see we have an EditText, a Button and a ListView.
Now let me tell you what we are going to do. We will save the Name from EditText and we will also display the saved name in ListView with the Sync Status. So the next part is designing a layout for our Custom ListView.
ListView
Create an xml file inside layout directory. I have created names.xml.
<?xml version="1.0" encoding="utf-8"?> <RelativeLayout xmlns:android="http://schemas.android.com/apk/res/android" android:padding="@dimen/activity_horizontal_margin" android:layout_width="match_parent" android:layout_height="match_parent"> <TextView android:text="Name" android:layout_alignParentLeft="true" android:id="@+id/textViewName" android:layout_width="wrap_content" android:layout_height="wrap_content" /> <ImageView android:background="@drawable/success" android:layout_alignParentRight="true" android:id="@+id/imageViewStatus" android:layout_width="wrap_content" android:layout_height="wrap_content" /> </RelativeLayout>
As you can see we have a TextView to display the name and an ImageView to display the status.
Download the icons from the below link, we have two images to display queued or synced.
Icons Download (Android Sync SQLite Database with Server) (0 downloads)
(adsbygoogle = window.adsbygoogle || []).push();
You have to copy the downloaded icons inside drawable folder.
Building ListView
Model Class
Now create a class Name.java and write the following code.
package net.simplifiedcoding.androidmysqlsync; /** * Created by Belal on 1/27/2017. */ public class Name private String name; private int status; public Name(String name, int status) this.name = name; this.status = status; public String getName() return name; public int getStatus() return status;
Now we will create an Adapter for our ListView.
Adapter
Create a class NameAdapter.java and write the following code.
package net.simplifiedcoding.androidmysqlsync; import android.content.Context; import android.view.LayoutInflater; import android.view.View; import android.view.ViewGroup; import android.widget.ArrayAdapter; import android.widget.ImageView; import android.widget.TextView; import java.util.List; /** * Created by Belal on 1/27/2017. */ public class NameAdapter extends ArrayAdapter<Name> //storing all the names in the list private List<Name> names; //context object private Context context; //constructor public NameAdapter(Context context, int resource, List<Name> names) super(context, resource, names); this.context = context; this.names = names; @Override public View getView(int position, View convertView, ViewGroup parent) //getting the layoutinflater LayoutInflater inflater = (LayoutInflater) context.getSystemService(Context.LAYOUT_INFLATER_SERVICE); //getting listview itmes View listViewItem = inflater.inflate(R.layout.names, null, true); TextView textViewName = (TextView) listViewItem.findViewById(R.id.textViewName); ImageView imageViewStatus = (ImageView) listViewItem.findViewById(R.id.imageViewStatus); //getting the current name Name name = names.get(position); //setting the name to textview textViewName.setText(name.getName()); //if the synced status is 0 displaying //queued icon //else displaying synced icon if (name.getStatus() == 0) imageViewStatus.setBackgroundResource(R.drawable.stopwatch); else imageViewStatus.setBackgroundResource(R.drawable.success); return listViewItem;
Coding MainActivity
Now lets come inside MainActivity.java and write the following code.
package net.simplifiedcoding.androidmysqlsync; import android.Manifest; import android.app.ProgressDialog; import android.content.BroadcastReceiver; import android.content.Context; import android.content.Intent; import android.content.IntentFilter; import android.content.pm.PackageManager; import android.database.Cursor; import android.net.ConnectivityManager; import android.support.v4.content.ContextCompat; import android.support.v7.app.AppCompatActivity; import android.os.Bundle; import android.view.View; import android.widget.Button; import android.widget.EditText; import android.widget.ListView; import android.widget.Toast; import com.android.volley.AuthFailureError; import com.android.volley.Request; import com.android.volley.RequestQueue; import com.android.volley.Response; import com.android.volley.VolleyError; import com.android.volley.toolbox.StringRequest; import com.android.volley.toolbox.Volley; import org.json.JSONException; import org.json.JSONObject; import java.util.ArrayList; import java.util.HashMap; import java.util.List; import java.util.Map; public class MainActivity extends AppCompatActivity implements View.OnClickListener /* * this is the url to our webservice * make sure you are using the ip instead of localhost * it will not work if you are using localhost * */ public static final String URL_SAVE_NAME = "http://192.168.1.107/SqliteSync/saveName.php"; //database helper object private DatabaseHelper db; //View objects private Button buttonSave; private EditText editTextName; private ListView listViewNames; //List to store all the names private List<Name> names; //1 means data is synced and 0 means data is not synced public static final int NAME_SYNCED_WITH_SERVER = 1; public static final int NAME_NOT_SYNCED_WITH_SERVER = 0; //a broadcast to know weather the data is synced or not public static final String DATA_SAVED_BROADCAST = "net.simplifiedcoding.datasaved"; //Broadcast receiver to know the sync status private BroadcastReceiver broadcastReceiver; //adapterobject for list view private NameAdapter nameAdapter; @Override protected void onCreate(Bundle savedInstanceState) super.onCreate(savedInstanceState); setContentView(R.layout.activity_main); //initializing views and objects db = new DatabaseHelper(this); names = new ArrayList<>(); buttonSave = (Button) findViewById(R.id.buttonSave); editTextName = (EditText) findViewById(R.id.editTextName); listViewNames = (ListView) findViewById(R.id.listViewNames); //adding click listener to button buttonSave.setOnClickListener(this); //calling the method to load all the stored names loadNames(); //the broadcast receiver to update sync status broadcastReceiver = new BroadcastReceiver() @Override public void onReceive(Context context, Intent intent) //loading the names again loadNames(); ; //registering the broadcast receiver to update sync status registerReceiver(broadcastReceiver, new IntentFilter(DATA_SAVED_BROADCAST)); /* * this method will * load the names from the database * with updated sync status * */ private void loadNames() names.clear(); Cursor cursor = db.getNames(); if (cursor.moveToFirst()) do Name name = new Name( cursor.getString(cursor.getColumnIndex(DatabaseHelper.COLUMN_NAME)), cursor.getInt(cursor.getColumnIndex(DatabaseHelper.COLUMN_STATUS)) ); names.add(name); while (cursor.moveToNext()); nameAdapter = new NameAdapter(this, R.layout.names, names); listViewNames.setAdapter(nameAdapter); /* * this method will simply refresh the list * */ private void refreshList() nameAdapter.notifyDataSetChanged(); /* * this method is saving the name to ther server * */ private void saveNameToServer() final ProgressDialog progressDialog = new ProgressDialog(this); progressDialog.setMessage("Saving Name..."); progressDialog.show(); final String name = editTextName.getText().toString().trim(); StringRequest stringRequest = new StringRequest(Request.Method.POST, URL_SAVE_NAME, new Response.Listener<String>() @Override public void onResponse(String response) progressDialog.dismiss(); try JSONObject obj = new JSONObject(response); if (!obj.getBoolean("error")) //if there is a success //storing the name to sqlite with status synced saveNameToLocalStorage(name, NAME_SYNCED_WITH_SERVER); else //if there is some error //saving the name to sqlite with status unsynced saveNameToLocalStorage(name, NAME_NOT_SYNCED_WITH_SERVER); catch (JSONException e) e.printStackTrace(); , new Response.ErrorListener() @Override public void onErrorResponse(VolleyError error) progressDialog.dismiss(); //on error storing the name to sqlite with status unsynced saveNameToLocalStorage(name, NAME_NOT_SYNCED_WITH_SERVER); ) @Override protected Map<String, String> getParams() throws AuthFailureError Map<String, String> params = new HashMap<>(); params.put("name", name); return params; ; VolleySingleton.getInstance(this).addToRequestQueue(stringRequest); //saving the name to local storage private void saveNameToLocalStorage(String name, int status) editTextName.setText(""); db.addName(name, status); Name n = new Name(name, status); names.add(n); refreshList(); @Override public void onClick(View view) saveNameToServer();
Now if you will run the application it will save the name to MySQL and SQLite with the sync or unsynced status.
But to send the unsynced names to the server automatically we have to detect the Network Status of the phone. For this we need one more broadcast receiver.
Detecting Network State
Creating Broadcast Receiver
Create a class named NetworkStateChecker.java and write the following code.
package net.simplifiedcoding.androidmysqlsync; import android.content.BroadcastReceiver; import android.content.Context; import android.content.Intent; import android.database.Cursor; import android.net.ConnectivityManager; import android.net.NetworkInfo; import com.android.volley.AuthFailureError; import com.android.volley.Request; import com.android.volley.Response; import com.android.volley.VolleyError; import com.android.volley.toolbox.StringRequest; import org.json.JSONException; import org.json.JSONObject; import java.util.HashMap; import java.util.Map; /** * Created by Belal on 1/27/2017. */ public class NetworkStateChecker extends BroadcastReceiver //context and database helper object private Context context; private DatabaseHelper db; @Override public void onReceive(Context context, Intent intent) this.context = context; db = new DatabaseHelper(context); ConnectivityManager cm = (ConnectivityManager) context.getSystemService(Context.CONNECTIVITY_SERVICE); NetworkInfo activeNetwork = cm.getActiveNetworkInfo(); //if there is a network if (activeNetwork != null) activeNetwork.getType() == ConnectivityManager.TYPE_MOBILE) //getting all the unsynced names Cursor cursor = db.getUnsyncedNames(); if (cursor.moveToFirst()) do //calling the method to save the unsynced name to MySQL saveName( cursor.getInt(cursor.getColumnIndex(DatabaseHelper.COLUMN_ID)), cursor.getString(cursor.getColumnIndex(DatabaseHelper.COLUMN_NAME)) ); while (cursor.moveToNext()); /* * method taking two arguments * name that is to be saved and id of the name from SQLite * if the name is successfully sent * we will update the status as synced in SQLite * */ private void saveName(final int id, final String name) StringRequest stringRequest = new StringRequest(Request.Method.POST, MainActivity.URL_SAVE_NAME, new Response.Listener<String>() @Override public void onResponse(String response) try JSONObject obj = new JSONObject(response); if (!obj.getBoolean("error")) //updating the status in sqlite db.updateNameStatus(id, MainActivity.NAME_SYNCED_WITH_SERVER); //sending the broadcast to refresh the list context.sendBroadcast(new Intent(MainActivity.DATA_SAVED_BROADCAST)); catch (JSONException e) e.printStackTrace(); , new Response.ErrorListener() @Override public void onErrorResponse(VolleyError error) ) @Override protected Map<String, String> getParams() throws AuthFailureError Map<String, String> params = new HashMap<>(); params.put("name", name); return params; ; VolleySingleton.getInstance(context).addToRequestQueue(stringRequest);
Adding Receiver in Manifest
Add the following code in your AndroidManifest.xml file inside application tag.
<receiver android:name=".NetworkStateChecker"> <intent-filter> <action android:name="android.net.conn.CONNECTIVITY_CHANGE" /> </intent-filter> </receiver>
Registering Receiver
You also need to register the receiver. So add the following line inside onCreate() method of your MainActivity.java file.
registerReceiver(new NetworkStateChecker(), new IntentFilter(ConnectivityManager.CONNECTIVITY_ACTION));
Now you can run your application.
Testing the Application
Run your application. And try saving the name when internet is available also turn off the internet and again try saving your name.
Android Sync SQLite Database with Server
When the internet will be available again the data will be automatically sent to MySQL.
Download Source Code
You can get the source code from the following GitHub repository.
Android Sync SQlite Database with Server Source Code
So thats it for this android sync sqlite database with server tutorial friends. Feel free to leave your comments if you are having any troubles making the project. Also follow the steps carefully as the post is very long. And if you found this helpful please favor us by sharing this post in your social network. Thank You 🙂
0 notes
Quote
LiteFS is a FUSE-based file system for replicating SQLite databases across a cluster of machines. It works as a passthrough file system that intercepts writes to SQLite databases in order to detect transaction boundaries and record changes on a per-transaction level in LTX files.
superfly/litefs: FUSE-based file system for replicating SQLite databases across a cluster of machines
0 notes
Text
Databases are key in any production environment as they are used to store and organize data. A database is defined as a collection of structured data. They are majorly classified into two categories: Relational databases (RDBMS or SQL databases): They store data in tables and rows, the tables are then linked using keys. The popular relational databases are MySQL, MariaDB, PostgreSQL, SQLite e.t.c Non-relational databases(NoSQL databases): They store data using a storage model optimized for specific requirements. The most popular NoSQL databases are MongoDB, Couchbase, Apache Cassandra, Redis, Apache HBase e.t.c PostgreSQL/Postgres is a free and open-source, object-oriented relational database management system for both small and large projects. It implements the Structured Query Language and also supports non-relational (JSON) queries. This database system has been in active development for over 30 years, resulting in high resilience and performance with notable levels of integrity. PostgreSQL finds use in several areas such as primary storage for web data, and mobile and analytic applications. The latest release version, PostgreSQL 14 has innumerable performance improvements. These improvements continue to hold the reputation of PostgreSQL in connection concurrency, logical replication, high-write workloads, and query parallelism. The cool features tied to this release are: Performance improvements through parallel queries, heavily concurrent workloads, partitioned databases, logical replication, and vacuuming. JSON conveniences and multi ranges improvements enable the representation of non-contiguous data ranges. OUT parameters can now be used to return data from stored procedures. Subscription operators were added to the JSON and hstore types. Supported pipelined queries through libpq, which significantly increases throughput over high-latency connections. Security enhancements Updates to B-tree indexes are more efficiently managed, resulting in less index bloat. This guide covers all the steps on how to install and use PostgreSQL 14 in Rocky Linux 9. 1. Install PostgreSQL 14 on Rocky Linux 9 The default Rocky Linux 9 repositories have PostgreSQL 13 as the default and latest version. This can be verified by running the command below: $ dnf provides postgresql-server Last metadata expiration check: 0:01:10 ago on Tue 19 Jul 2022 03:58:17 PM CEST postgresql-server-13.7-1.el9_0.x86_64 : The programs needed to create and run a PostgreSQL server Repo : appstream Matched from: Provide : postgresql-server = 13.7-1.el9_0 However, in this guide, we are interested in PostgreSQL 14 which is not available in the default repositories. To be able to install it, we need to add an extra repository to the system. To add the PostgreSQL 14 repository on Rocky Linux 9, use the command: sudo dnf install -y https://download.postgresql.org/pub/repos/yum/reporpms/EL-9-x86_64/pgdg-redhat-repo-latest.noarch.rpm Disable the built-in PostgreSQL module; sudo dnf -qy module disable postgresql Once the repository has been added, PostgreSQL 14 can be installed on Rocky Linux 9 by executing the command: sudo dnf install postgresql14-server Dependency Tree ..... Transaction Summary ============================================================================================================= Install 4 Packages Total download size: 7.5 M Installed size: 32 M Is this ok [y/N]: y Initialize PostgreSQL: sudo /usr/pgsql-14/bin/postgresql-14-setup initdb Now start and enable PostgreSQL 14 on Rocky Linux 9 sudo systemctl start postgresql-14 && sudo systemctl enable postgresql-14 Verify if the service is running: $ systemctl status postgresql-14.service ● postgresql-14.service - PostgreSQL 14 database server Loaded: loaded (/usr/lib/systemd/system/postgresql-14.service; enabled; vendor preset: disabled) Active: active (running) since Tue 2022-07-19 16:03:19 CEST; 32s ago
Docs: https://www.postgresql.org/docs/14/static/ Main PID: 31866 (postmaster) Tasks: 8 (limit: 23441) Memory: 16.5M CPU: 37ms CGroup: /system.slice/postgresql-14.service ├─31866 /usr/pgsql-14/bin/postmaster -D /var/lib/pgsql/14/data/ ├─31867 "postgres: logger " ├─31869 "postgres: checkpointer " ├─31870 "postgres: background writer " ├─31871 "postgres: walwriter " ├─31872 "postgres: autovacuum launcher " ├─31873 "postgres: stats collector " └─31874 "postgres: logical replication launcher " 2. Using PostgreSQL Roles and Databases Once installed, you are set to use PostgreSQL 14. But there are a few concepts available here: roles: this is used to handle client authentication and authorization. These are more similar to the Unix-style accounts but since PostgreSQL doesn’t distinguish between users and groups, it prefers to call them roles. ident authentication: This associates the Postgres roles with a matching Unix/Linux system account. In case a role exists within PostgreSQL, the Linux username with a similar identity is able to sign in as that role. When PostgreSQL is installed, a user account with the name postgres is crated and tied as the default PostgreSQL role. To login to PostgreSQL, you can use two methods: Option 1 Connecting to the instance directly with the sudo command below. $ sudo -u postgres psql could not change directory to "/home/rocky9": Permission denied psql (14.4) Type "help" for help. postgres=# Exit the shell using the command: postgres=# \q Option 2 Switching to the Postgres user then access the Postgres prompt sudo -i -u postgres Access the PostgreSQL prompt: [postgres@computingforgeeks ~]$ psql psql (14.4) Type "help" for help. postgres=# Here, to exit the shell, use the command: postgres=# \q Now exit the postgres account: [postgres@computingforgeeks ~]$ exit Creating a New Role in PostgreSQL 14 To create a new role in PostgreSQL 14, connect to the postgres role first: sudo -u postgres psql Create the user using the command: CREATE ROLE admin WITH LOGIN SUPERUSER CREATEDB CREATEROLE PASSWORD 'Passw0rd'; Verify the creation: postgres=# \du List of roles Role name | Attributes | Member of -----------+------------------------------------------------------------+----------- admin | Superuser, Create role, Create DB | postgres | Superuser, Create role, Create DB, Replication, Bypass RLS | postgres=# Creating a New Database in PostgreSQL 14 The next this is to create a new database for the created user above. Still, in the PostgreSQL shell, create a database with the same name as the user since the role will attempt to connect to a database. postgres=# CREATE DATABASE admin; CREATE DATABASE postgres=# \q Opening a Postgres Prompt with the New Role To access the created role, begin by adding the role as a Linux user sudo adduser admin Verify if you can connect to the created user: $ sudo -u admin psql could not change directory to "/home/rocky9": Permission denied psql (14.4) Type "help" for help. admin=# \conninfo You are connected to database "admin" as user "admin" via socket in "/var/run/postgresql" at port "5432". Creating Tables in PostgreSQL 14 Once connected the PostgreSQL using the new user and database, you can create a table using the command with the syntax below: CREATE TABLE table_name ( column_name1 col_type (field_length) column_constraints, column_name2 col_type (field_length), column_name3 col_type (field_length) ); For example: CREATE TABLE playground ( equip_id serial PRIMARY KEY, type varchar (50) NOT NULL, color varchar (25) NOT NULL, location varchar(25) check (location in ('north', 'south', 'west', 'east', 'northeast', 'southeast', 'southwest', 'northwest')),
install_date date ); Verify the creation: admin# \dt List of relations Schema | Name | Type | Owner --------+------------+-------+------- public | playground | table | admin (1 row) To view detailed information use: admin# \d List of relations Schema | Name | Type | Owner --------+-------------------------+----------+------- public | playground | table | admin public | playground_equip_id_seq | sequence | admin (2 rows) Adding, Querying, and Deleting Data in a Table With the table created, you can add the preferred data to it. for example: INSERT INTO playground (type, color, location, install_date) VALUES ('slide', 'blue', 'south', '2017-04-28'); INSERT INTO playground (type, color, location, install_date) VALUES ('swing', 'yellow', 'northwest', '2018-08-16'); Retrieve the added data: admin=# SELECT * FROM playground; equip_id | type | color | location | install_date ----------+-------+--------+-----------+-------------- 1 | slide | blue | south | 2017-04-28 2 | swing | yellow | northwest | 2018-08-16 (2 rows) You can delete entries in the table. For example: DELETE FROM playground WHERE type = 'slide'; SELECT * FROM playground; Sample Output: equip_id | type | color | location | install_date ----------+-------+--------+-----------+-------------- 2 | swing | yellow | northwest | 2018-08-16 (1 row) Updating Data in a Table To update data in an existing table we can proceed as shown. UPDATE playground SET color = 'red' WHERE type = 'swing'; You will have the color updated in “swing” to red admin=# SELECT * FROM playground; equip_id | type | color | location | install_date ----------+-------+-------+-----------+-------------- 2 | swing | red | northwest | 2018-08-16 (1 row) Exit the shell: admin=# \q 3. Configure PostgreSQL for Remote Access (optional) The PostgreSQL 14 can be configured for remote access. But before that, you need to familiarize yourself with a few concepts. As of now, you know the default authentication in PostgreSQL is the ident authentication. The other authentication types are: Password: here a role connects using a password. Trust: allows a role to connect as long as conditions are defined in the pg_hba.conf file are satisfied. Peer: similar to ident authentication but it is only supported on local connections. For remote access, we need to make a few configurations to the pg_hba.conf file. Allow the PostgreSQL 14 instance to be accessed from everywhere; sudo vim /var/lib/pgsql/14/data/pg_hba.conf In the opened file, make the below changes: # IPv4 local connections: host all all 127.0.0.1/32 scram-sha-256 host all all 0.0.0.0/0 md5 # IPv6 local connections: host all all ::1/128 scram-sha-256 host all all 0.0.0.0/0 md5 Then allow listening on * by editing the postgresql.conf file below. sudo vim /var/lib/pgsql/14/data/postgresql.conf Uncomment and edit the line: #------------------------------------------------------------------------------ # CONNECTIONS AND AUTHENTICATION #----------------------------------------------------------------------------- ....... listen_addresses='*' Restart the service for changes to apply: sudo systemctl restart postgresql-14.service 4. Connect to PostgreSQL 14 Instance Remotely. By default, PostgreSQL listens on port 5432. Verify this with the command: $ ss -tunelp | grep 5432 tcp LISTEN 0 244 0.0.0.0:5432 0.0.0.0:* uid:26 ino:59544 sk:9 cgroup:/system.slice/postgresql-14.service tcp LISTEN 0 244 [::]:5432 [::]:* uid:26 ino:59545 sk:c cgroup:/system.slice/postgresql-14.service v6only:1 To be able to access it, we need to allow this port through the firewall:
sudo firewall-cmd --add-port=5432/tcp --permanent sudo firewall-cmd --reload To access PostgreSQL from a remote host, use the command with the syntax: psql 'postgres://:@:/?sslmode=disable' For example: psql 'postgres://admin:[email protected]:5432/postgres?sslmode=disable' Sample Output: Conclusion We have triumphantly walked through a detailed demonstration of how to install PostgreSQL 14 on Rocky Linux 9. We have also learned a few basic operations on PostgreSQL. I hope this was informative.
0 notes
Text
0 notes
Text
SQLedge: Replicate Postgres to SQLite on the Edge
https://github.com/zknill/sqledge
0 notes
Text
Top 5 Database for iOS App Development
In the dynamic world of iOS app development, choosing the right database is a crucial step towards building successful and user-friendly applications. With a plethora of options available, it's essential to identify the top 5 databases that offer the ideal blend of features and performance. This guide will walk you through the leading database solutions for iOS app development, providing valuable insights and expert recommendations to help you make informed decisions. Top 5 Database for iOS App Development Firebase Realtime Database Firebase Realtime Database is a cloud-hosted NoSQL database that offers real-time synchronization and offline capabilities. This highly-scalable solution is perfect for applications requiring instant updates, such as messaging and collaboration apps. Its JSON-based structure allows for flexibility in data modeling. Key Features: - Real-time synchronization - Offline access - Flexible data structure - Scalable architecture Benefits: - Instant updates across devices - Reliable offline functionality - Seamless integration with other Firebase services CoreData CoreData is a framework provided by Apple for managing the object graph and persistence of data in iOS apps. It offers an efficient way to work with data models, relationships, and caching. While it's not a traditional database, CoreData provides a powerful local data storage solution. Key Features: - Object graph management - Data model relationships - Caching and performance optimization - Lightweight local storage Benefits: - Efficient data management - Reduced network requests - Enhanced performance for local data Realm Realm is a mobile database designed for simplicity and ease of use. It offers an object-oriented approach to database management and supports both local and server-based databases. Realm's live objects provide automatic updates whenever the data changes. Key Features: - Object-oriented database - Automatic data updates - Cross-platform support - Encryption and security features Benefits: - Intuitive data modeling - Real-time data synchronization - Seamless integration with various platforms SQLite SQLite is a lightweight and self-contained relational database engine that is embedded directly into the application. It's an ideal choice for applications that need a local database with a small memory footprint. Despite its compact size, SQLite is powerful and supports SQL queries. Key Features: - Self-contained database engine - Small memory footprint - SQL query support - ACID-compliant transactions Benefits: - Minimal setup and configuration - Efficient local storage - Reliable data integrity Couchbase Lite Couchbase Lite is a NoSQL database that focuses on mobile-first applications. It offers a unique synchronization feature that enables seamless data replication between devices. This is particularly useful for apps that require data consistency across various platforms. Key Features: - NoSQL document-based storage - Multi-platform synchronization - Offline-first architecture - Conflict resolution capabilities Benefits: - Consistent data across devices - Robust offline functionality - Simplified conflict resolution FAQs Q: Which database is best for real-time synchronization in iOS apps?A: Firebase Realtime Database is an excellent choice for real-time synchronization, offering instant updates and offline access. Q: Can I use CoreData for server-based databases?A: CoreData is primarily designed for local data storage. For server-based databases, consider solutions like Firebase or Realm. Q: Is SQLite suitable for large-scale applications?A: While SQLite is lightweight and efficient, it may not be the best choice for large-scale applications with high data volumes. Q: How does Realm's automatic data update feature work?A: Realm's live objects automatically update whenever the underlying data changes, ensuring real-time synchronization. Q: Does Couchbase Lite support conflict resolution?A: Yes, Couchbase Lite includes conflict resolution capabilities, ensuring data consistency in multi-device environments. Q: Can I use multiple databases in a single iOS app?A: Yes, you can use different databases for various purposes within an iOS app, based on your application's requirements. Conclusion: Selecting the right database for your iOS app development project is a critical decision that impacts performance, user experience, and scalability. By exploring the top 5 databases – Firebase Realtime Database, CoreData, Realm, SQLite, and Couchbase Lite – you gain a deeper understanding of their features and benefits. Whether you need real-time synchronization, efficient local storage, or seamless multi-device data replication, there's a suitable database solution for your specific needs. Remember to consider factors like data model complexity, synchronization requirements, and your app's growth potential when making your choice. Read the full article
0 notes
Quote
Stop building slow, complex, fragile software systems. Safely run your application on a single server. Fully-replicated database with no pain and little cost.
Litestream - Streaming SQLite Replication
0 notes
Photo

How to Build and Structure a Node.js MVC Application
In a non-trivial application, the architecture is as important as the quality of the code itself. We can have well-written pieces of code, but if we don’t have good organization, we’ll have a hard time as the complexity increases. There’s no need to wait until the project is half-way done to start thinking about the architecture; the best time is before starting, using our goals as beacons for our choices.
Node.js doesn’t have a de facto framework with strong opinions on architecture and code organization in the same way that Ruby has the Rails framework, for example. As such, it can be difficult to get started with building full web applications with Node.
In this tutorial, we’re going to build the basic functionality of a note-taking app using the MVC architecture. To accomplish this, we’re going to employ the Hapi.js framework for Node.js and SQLite as a database, using Sequelize.js, plus other small utilities, to speed up our development. We’re going to build the views using Pug, the templating language.
What is MVC?
Model-View-Controller (or MVC) is probably one of the most popular architectures for applications. As with a lot of other cool things in computer history, the MVC model was conceived at PARC for the Smalltalk language as a solution to the problem of organizing applications with graphical user interfaces. It was created for desktop applications, but since then, the idea has been adapted to other mediums including the Web.
We can describe the MVC architecture in simple terms:
Model: the part of our application that will deal with the database or any data-related functionality.
View: everything the user will see — basically, the pages that we’re going to send to the client.
Controller: the logic of our site, and the glue between models and views. Here we call our models to get the data, then we put that data on our views to be sent to the users.
Our application will allow us to create, view, edit and delete plain-text notes. It won’t have other functionality, but because we’ll have a solid architecture already defined we won’t have a lot of trouble adding things later.
This tutorial assumes you have a recent version of Node installed on your machine. If this isn’t the case, please consult our tutorial on getting up and running with Node.
You can check out the final application in the accompanying GitHub repository, so you get a general overview of the application structure.
Laying out the Foundation
The first step when building any Node.js application is to create a package.json file, which is going to contain all of our dependencies and scripts. Instead of creating this file manually, npm can do the job for us using the init command:
mkdir notes-board cd notes-board npm init -y
After the process is complete, we’ll have a package.json file ready to use.
Note: if you’re not familiar with these commands, checkout our Beginner’s Guide to npm.
We’re going to proceed to install Hapi.js — the framework of choice for this tutorial. It provides a good balance between simplicity, stability and features that will work well for our use case (although there are other options that would also work just fine).
npm install @hapi/[email protected]
This command will download Hapi.js and add it to our package.json file as a dependency.
Note: We’ve specified v18.4.0 of Hapi.js, as it’s compatible with Node versions 8, 10, and 12. If you’re using Node 12, you can opt to install the latest version (Hapi v19.1.0).
Now we can create our entry file — the web server that will start everything. Go ahead and create a server.js file in your application directory and add the following code to it:
"use strict"; const Hapi = require("@hapi/hapi"); const Settings = require("./settings"); const init = async () => { const server = new Hapi.Server({ port: Settings.port }); server.route({ method: "GET", path: "/", handler: (request, h) => { return "Hello, world!"; } }); await server.start(); console.log(`Server running at: ${server.info.uri}`); }; process.on("unhandledRejection", err => { console.log(err); process.exit(1); }); init();
This is going to be the foundation of our application.
First, we indicate that we’re going to use strict mode, which is a common practice when using the Hapi.js framework.
Next, we include our dependencies and instantiate a new server object where we set the connection port to 3000 (the port can be any number above 1023 and below 65535).
Our first route for our server will work as a test to see if everything is working, so a “Hello, world!” message is enough for us. In each route, we have to define the HTTP method and path (URL) that it will respond to, and a handler, which is a function that will process the HTTP request. The handler function can take two arguments: request and h. The first one contains information about the HTTP call, and the second will provide us with methods to handle our response to that call.
Finally, we start our server with the server.start() method.
Storing Our Settings
It’s good practice to store our configuration variables in a dedicated file. This file exports a JSON object containing our data, where each key is assigned from an environment variable — but without forgetting a fallback value.
In this file, we can also have different settings depending on our environment (such as development or production). For example, we can have an in-memory instance of SQLite for development purposes, but a real SQLite database file on production.
Selecting the settings depending on the current environment is quite simple. Since we also have an env variable in our file which will contain either development or production, we can do something like the following to get the database settings:
const dbSettings = Settings[Settings.env].db;
So dbSettings will contain the setting of an in-memory database when the env variable is development, or will contain the path of a database file when the env variable is production.
Also, we can add support for a .env file, where we can store our environment variables locally for development purposes. This is accomplished using a package like dotenv for Node.js, which will read a .env file from the root of our project and automatically add the found values to the environment.
Note: if you decide to also use a .env file, make sure you install the package with npm install dotenv and add it to .gitignore so you don’t publish any sensitive information.
Our settings.js file will look like this:
// This will load our .env file and add the values to process.env, // IMPORTANT: Omit this line if you don't want to use this functionality require("dotenv").config({ silent: true }); module.exports = { port: process.env.PORT || 3000, env: process.env.NODE_ENV || "development", // Environment-dependent settings development: { db: { dialect: "sqlite", storage: ":memory:" } }, production: { db: { dialect: "sqlite", storage: "db/database.sqlite" } } };
Now we can start our application by executing the following command and navigating to http://localhost:3000 in our web browser:
node server.js
Note: this project was tested on Node v12.15.0. If you get any errors, ensure you have an updated installation.
Defining the Routes
The definition of routes gives us an overview of the functionality supported by our application. To create our additional routes, we just have to replicate the structure of the route that we already have in our server.js file, changing the content of each one.
Let’s start by creating a new directory called lib in our project. Here we’re going to include all the JS components.
Inside lib, let’s create a routes.js file and add the following content:
"use strict"; const Path = require("path"); module.exports = [ // we’re going to define our routes here ];
In this file, we’ll export an array of objects that contain each route of our application. To define the first route, add the following object to the array:
{ method: "GET", path: "/", handler: (request, h) => { return "All the notes will appear here"; }, config: { description: "Gets all the notes available" } },
Our first route is for the home page (/), and since it will only return information, we assign it a GET method. For now, it will only give us the message “All the notes will appear here”, which we’re going to change later for a controller function. The description field in the config section is only for documentation purposes.
Then, we create the four routes for our notes under the /note/ path. Since we’re building a CRUD application, we’ll need one route for each action with the corresponding HTTP methods.
Add the following definitions next to the previous route:
{ method: "POST", path: "/note", handler: (request, h) => { return "New note"; }, config: { description: "Adds a new note" } }, { method: "GET", path: "/note/{slug}", handler: (request, h) => { return "This is a note"; }, config: { description: "Gets the content of a note" } }, { method: "PUT", path: "/note/{slug}", handler: (request, h) => { return "Edit a note"; }, config: { description: "Updates the selected note" } }, { method: "GET", path: "/note/{slug}/delete", handler: (request, h) => { return "This note no longer exists"; }, config: { description: "Deletes the selected note" } }
We’ve done the same as in the previous route definition, but this time we’ve changed the method to match the action we want to execute.
The only exception is the delete route. In this case, we’re going to define it with the GET method rather than DELETE and add an extra /delete in the path. This way, we can call the delete action just by visiting the corresponding URL.
Note: if you plan to implement a strict REST interface, then you would have to use the DELETE method and remove the /delete part of the path.
We can name parameters in the path by surrounding the word in curly braces. Since we’re going to identify notes by a slug, we add {slug} to each path, with the exception of the POST route; we don’t need it there because we’re not going to interact with a specific note, but to create one.
You can read more about Hapi.js routes on the official documentation.
Now, we have to add our new routes to the server.js file. Let’s import the routes file at the top of the file:
const Routes = require("./lib/routes");
Then let’s replace our current test route with the following:
server.route(Routes);
The post How to Build and Structure a Node.js MVC Application appeared first on SitePoint.
by James Kolce via SitePoint https://ift.tt/398Hi0R
0 notes